
This solution enables you to customize the product names that appear on your checkout page based on which payment option your customers select.
This step-by-step guide will show you exactly how to set this up using the Product Names plugin for WooCommerce.
What This Plugin Does
The Product Names plugin allows you to:
- Set custom product names that appear only when specific payment methods are selected
- Keep your original product names for all other payment methods
- Work with both simple products and product variations
- Automatically detect when customers switch between payment methods
- Support any payment gateway (not just credit cards)
Step 1: Install the Plugin
- Download the Payment Option Product Name Changer for WooCommerce plugin
- Go to your WordPress admin dashboard
- Navigate to Plugins > Add New
- Click “Upload Plugin” and select the zip file
- Click “Install Now” and then “Activate Plugin”
Step 2: Configure Plugin Settings
- In your WordPress admin, go to WooCommerce > Product Names
- You’ll see a settings page with payment gateway selection:
A list of all your ENABLED payment gateways
- Check the boxes next to the payment methods where you want custom names to appear
Example: Check “BACS” if you want custom names when bank transfer is selected - Click “Save Changes”
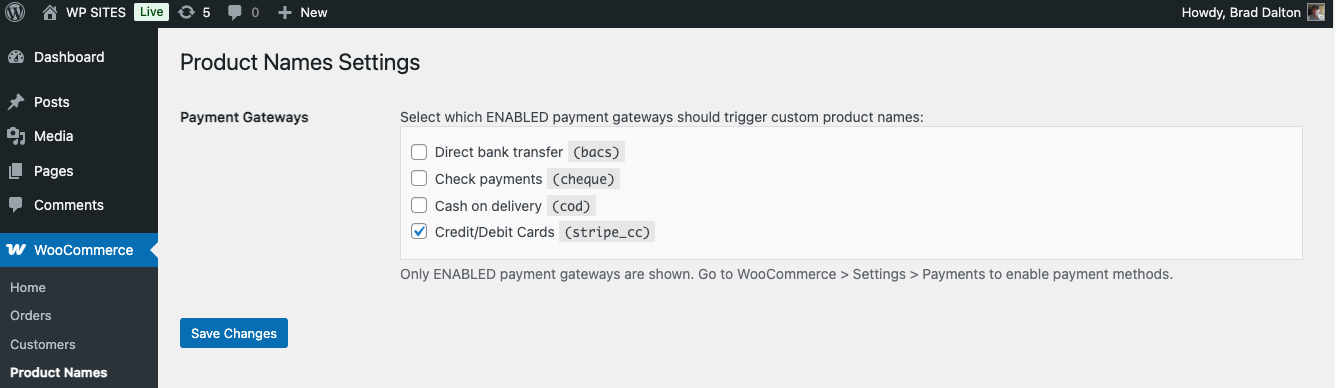
This setting ensures that custom names only appear when customers select the payment methods you’ve chosen.
Step 3: Set Custom Names for Your Products
For Simple Products:
- Go to Products > All Products in your WordPress admin
- Click “Edit” on any product you want to customize
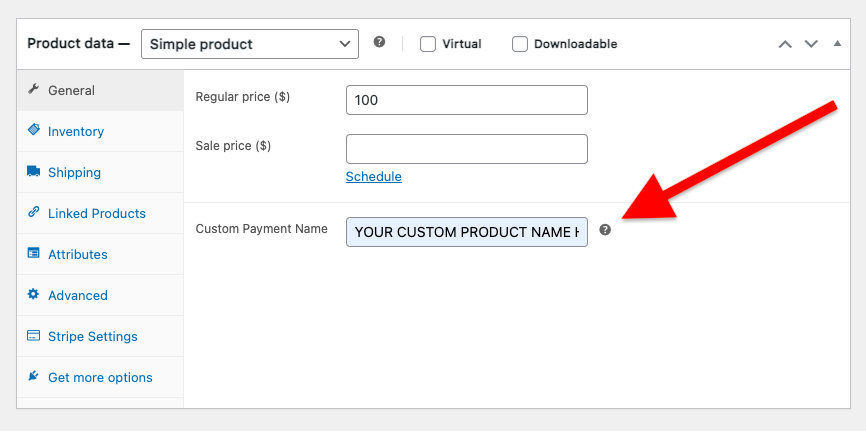
- Scroll down to the “Product Data” section
- Look for the “Custom Payment Name” field
- Enter the custom name you want to show when credit card payment is selected
Example: If your product is “Premium T-Shirt”, you might enter “Premium T-Shirt – CC Payment” - Click “Update” to save
For Product Variations:
- Edit a variable product (like a t-shirt with different sizes/colors)
- Go to the “Variations” tab
- For each variation, you’ll see a “Custom Payment Name” field
- Enter custom names for each variation
Example: “Large Blue T-Shirt – CC Payment” - Click “Save Changes”
Step 4: Test Your Setup
- Go to your website’s checkout page
- Add a product to your cart that has a custom name set
- Proceed to checkout
- Try selecting different payment methods:
- When you select a payment method you configured: You should see your custom product name
- When you select other payment methods: You should see the original product name
Switch between payment methods to see the names change dynamically
Step 5: Understanding How It Works
The plugin works with dynamic payment method detection:
Payment Gateway Selection:
- You choose which payment gateways should trigger custom product names
- Only ENABLED payment gateways are shown in the settings
- If no gateways are selected, custom names won’t be applied anywhere
Dynamic Product Name Changes:
- When a selected payment method is chosen at checkout, product names change to custom names
- When switching to a non-selected payment method, product names return to original names
- This works on both classic and block checkout pages
- Custom names are also sent to payment gateway metadata (like Stripe)
Supported Payment Gateways
The plugin works with any payment gateway that’s enabled in your WooCommerce store:
- Stripe
- PayPal
- BACS (Bank Transfer)
- Square
- Authorize.Net
- Braintree
- Eway
- And any other payment gateway you have enabled
Need Help?
If you run into any issues or need assistance:
- Email: plugins@wpsites.net
The plugin is designed to be simple and user-friendly, but if you need help with setup or customization, don’t hesitate to reach out.


Leave a Reply
You must be logged in to post a comment.