• Skip to primary navigation
  • Skip to main content
  • Skip to primary sidebar

WP SITES

2785

Original Genesis & WooCommerce Tutorials & 6000+ Guaranteed Code

Snippets

  • Try Premium
  • Log in

Installing Fonts In WordPress – Includes Video

In this post, we”ll take a look at the best way to add both custom fonts and Google fonts in WordPress.

Video

This video shows you how to install fonts in your WordPress child theme.

Online Generator

Font Squirrel offers an online generator which you can use to install your fonts in WordPress manually.

This tutorial is based on using the @Font Face Generator

If you don’t want to use a plugin to get the job done, this is one of the best methods you should use and its not complicated at all.

Why use the @font face generator?

Because it converts your otf & ttf font files into other file types which are accepted by all browsers and mobile devices.

Here’s what you get after conversion:

  • TrueType Fonts for Firefox 3.5+ , Opera 10+, Safari 3.1+, Chrome 4.0.249.4+
  • EOT fonts for Internet Explorer 4+
  • WOFF fonts for Firefox 3.6+, Internet Explorer 9+, Chrome 5+
  • SVG fonts for iPad and iPhone
  • Cufón fonts in case you want them
  • Demo.html and stylesheet.css so you can get going fast

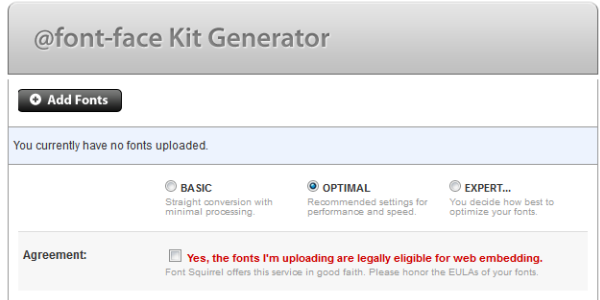
@font-face Generator

To use the generator:

  • Choose which option you want to use to convert your font files
  • Add your ttf or otf font files to the generator so they’ll be uploaded
  • Once converted, download your zipped file kit to your local computer
  • Install the files in WordPress

Install Font Files In WordPress

Once you’ve downloaded your kit of files, unzip them onto your desktop.

If you open the style.css file included in the kit, you’ll find the CSS code which includes all the file types the generator has created.

Example:

Default kit CSS

@font-face {
font-family: 'trashhandregular';
src: url('trashhand.eot');
src: url('trashhand.eot?#iefix') format('embedded-opentype'),
url('trashhand.woff') format('woff'),
url('trashhand.ttf') format('truetype'),
url('trashhand.svg#trashhandregular') format('svg');
font-weight: normal;
font-style: normal;
}

Files in Kit

I deleted the specimen files before uploading them into my child themes Fonts directory.

Font Files in Kit

I created a folder in my child theme named Fonts and dragged all the files from the kit into this new folder. This way i can add more fonts to the folder and keep it organized.

  • I didn’t change the url’s to the different font file types.
  • I didn’t add the CSS code to the child theme’s style.css file

Using Custom Fonts In Your Theme

Once you’ve successfully installed your new fonts, you can go into your child theme’s style.css file and replace any existing font to your new fonts.

Example:

textarea {
color: #444;
font-family: trashhand, Arial, Helvetica, Tahoma;
font-size: 16px;
font-weight: normal;
line-height: 20px;
margin: 0;
padding: 10;
text-decoration: none;
}

You’ll find more information about how to install fonts in the kit you download after using the generator.

Google Fonts

You should always use the wp_enqueue_scripts function when loading fonts in WordPress.

Simply add this code to your child themes functions.php file and change the font names on the code to the ones you have chosen from the Google Web fonts page on their site.

add_action( 'wp_enqueue_scripts', 'add_google_fonts' );
function add_google_fonts() {

	wp_enqueue_style( 'google-fonts', '//fonts.googleapis.com/css?family=EB+Garamond|Spinnaker', array(), CHILD_THEME_VERSION );
	
}

This is the best way to install and add your custom fonts in WordPress and tested on both a local and live site.

Reader Interactions

Comments

  1. Irene says

    June 25, 2014 at 11:41 pm

    Thanks for the tutorial. It cleared a few things up. I still can’t get it to work, however.

    Here’s the code. I also tried the same thing without the wp-content/themes/expound part.

    Log in to Reply
    • Brad Dalton says

      June 26, 2014 at 6:19 pm

      Irene

      Happy to help but your code is not displaying. Please paste it into a Github Gist and link to it from here. Thanks

      Log in to Reply
  2. Marko says

    June 21, 2014 at 5:15 pm

    Hi Brad,
    When I open my website on one of my two computers at home everything works fine and shows my custom font “Courgette”. But when my site is opened on the other computer and also on the computer at work or on my phone the custom font does not display. I already cleared cookies and cache on all computers but no difference. Previously, I also have used the “@import” method without success. Now, I did exactly as you explain in the video. Do you have any suggestion what else I need to do to solve this problem?

    Thanks
    Marko

    Log in to Reply
    • Brad Dalton says

      June 21, 2014 at 11:57 pm

      It may depend on the code you used to install your fonts.

      It may also be the CSS code is over written so you may need to remove any CSS which uses the old fonts.

      Hard to say without reviewing the code.

      Log in to Reply
  3. Brandon says

    June 18, 2014 at 12:32 pm

    Hello Brad,

    Thanks for the tutorial. I wish I could get this to work. I’ve tried reading and re-reading your tutorial as well as others, and I simply cannot get this @fontface rule to work.
    I’ve uploaded a font to Font Squirrel and generated a web kit, included the CSS in my stylesheet, changed the src url to include the fonts directory I created, and still nothing. I’m using the 2014 theme, but I cannot for the life of me get my custom font to work. Any suggestions?
    Thanks!

    Log in to Reply
    • Brad Dalton says

      June 18, 2014 at 10:00 pm

      Hello Brandon

      If you don’t get the path right it will not work.

      This is exactly the same method as i use on this site with custom chalk board fonts for the single post entry titles which you can see in my style sheet.

      Please paste the CSS for your fonts into a Github Gist and link to it from here.

      Log in to Reply
  4. techikhan says

    June 9, 2014 at 3:50 am

    Hi Brad,

    I am in trouble but this is not exactly about fonts. The thing is that I am new to WordPress but I wanted to build a site. So, I bought a premium theme and customised it, now it is almost finished.
    But now I have realised that for many things its recommended to use a child theme instead of making changes to the real theme.
    So, I am kinda stuck because I have done a lot of work and now I am not sure what will happen if I upgrade my theme. The other thing is that things like installing custom fonts will required changes in style.css and I am afraid that it can have adverse effect later.
    Please guide me about what can be done now?

    Thanks.

    Log in to Reply
    • Brad Dalton says

      June 9, 2014 at 11:26 am

      You will need to move all the modified code to a child theme so when your parent theme updates, the modified code will still work as its not over written. Please use the contact form if you need help with this.

      Log in to Reply
  5. Greg says

    February 18, 2014 at 12:57 pm

    Hey Brad,

    Just adding to my post earlier…

    Does the CSS code actually go above the first section of code…..In parallax pro there is a header and then the table of contents….

    This is the last section of the table of contents and the beginning of the code as far as I can see…

    - Max-width: 1023px
    		- Max-width: 768px
    
    */
    
    XXXXXXXXXXXXXX
    /*
    HTML5 Reset
    -----------------------------------------------
    /* Baseline Normalize
    	normalize.css v2.1.3 | MIT License | git.io/normalize
    --------------------------------------------- */

    Is that the right place to place the css (marked with XXXXXXXXXX)?

    Regards
    Greg

    Log in to Reply
    • Brad Dalton says

      February 18, 2014 at 3:36 pm

      Thats o.k Greg

      Log in to Reply
  6. Jo says

    February 18, 2014 at 4:35 am

    Hi there,

    Where exactly in the functions.php file did you add the wp_enqueue_scripts function? I’m terrified of messing with functions.php after doing so temporarily blitzed my site. Also, does this apply when working with a child theme?

    Thanks! J

    Log in to Reply
    • Brad Dalton says

      February 18, 2014 at 4:58 am

      Hi Jo

      At the end of the child themes functions.php file.

      After all the other code.

      Log in to Reply
      • Jo says

        February 18, 2014 at 5:00 am

        Thanks!

        Log in to Reply
  7. Greg says

    February 17, 2014 at 2:43 pm

    Hi Brad,

    I’m using Genesis and Parallax Pro….currently just testing though

    Thanks for the tutorial….
    You say:
    •I didn’t change the url’s to the different font file types.
    •I didn’t add the CSS code to the child theme’s style.css file

    Just trying to understand why you didn’t do the above – is it simply not necessary?

    Regards
    Greg

    Log in to Reply
    • Brad Dalton says

      February 17, 2014 at 3:01 pm

      Hello Greg

      The path to the font files was already correct in the style sheet generated by the online tool however you could also drag in the entire folder after extracting and rename it to fonts in your child themes root directory.

      Another option is to add the CSS to your child themes style.css file and change the path to the font files.

      The main issue people have when installing fonts is they get the path to the font files wrong

      Log in to Reply
      • Greg says

        February 18, 2014 at 12:26 pm

        Hi Brad,

        Thanks for the answer…

        Have uploaded the fonts to server and renamed the path in the CSS file.

        Now need to add the CSS via the child theme style.css but the question is where do you place the file….at the top before anything else (see below) or at the bottom after the code?

        This is what is right at the top of the style.css:

        /*
        Theme Name: Parallax Pro Theme
        Theme URI: http://my.studiopress.com/themes/parallax/
        Description: A mobile responsive and HTML5 theme built for the Genesis Framework.
        Author: StudioPress
        Author URI: http://www.studiopress.com/

        Regards
        Greg

        Log in to Reply
  8. ian says

    September 10, 2013 at 3:52 am

    I tried doing this like five times and it does not work. is there any way you can help me ?

    Log in to Reply
    • Brad Dalton says

      September 10, 2013 at 10:05 am

      Hi Ian

      Took me 6 times to get it right myself last week.

      It can be a bit tricky if you miss something it may not work.

      Hard to say what you missed unless i logged in and took a look.

      You are welcome to paste the code here and i’ll take a look for you.

      Log in to Reply
  9. Sandi says

    August 22, 2013 at 7:58 pm

    Thanks so much for this tutorial! After watching the video I finally got it to work!

    Log in to Reply
    • Brad Dalton says

      August 22, 2013 at 8:17 pm

      Good stuff Sandi!

      Log in to Reply
  10. henry says

    April 17, 2013 at 7:57 am

    the site is in my local machine in “Instant WordPress”. I put the the stylesheet and the font files in …htdocs/wordpress/wp-content/themes/salespresspro/customfonts.

    the site is not on a webserver yet. Also, how do you copy files to instantwordpress?

    I can email you the stylesheet file so you can see the content. Let me know where to send it. thanks a lot.

    Log in to Reply
    • Brad Dalton says

      April 17, 2013 at 8:01 am

      Send me a copy of the style.css file Henry. Are you using Genesis?

      Log in to Reply

Leave a Reply Cancel reply

You must be logged in to post a comment.

Primary Sidebar

Recent Posts

  • Add Pagination to AgentPress Pro Listings Archive Page
  • List of Code Snippets for WooCommerce
  • Style First Nav Menu Item Using CSS
  • Genesis One Page Block Theme
  • Reposition Image Before Title When Mobile Responsive

Advertise · WPEngine · Genesis · Log in

  • Access Problems
  • Account Details
  • Consulting
  • Tags
 

Loading Comments...
 

You must be logged in to post a comment.