
You can easily create a row of images in WordPress horizontally or vertically.
The only problem is, the spacing won’t be generated automatically like it is when you insert a gallery.
When you create and insert a gallery, WordPress offers you a choice of how many columns you want to create. When you insert the gallery of images, the functions in WordPress automatically space each image perfectly.
However, this is not the case if you decide to insert images into a post or page in a row as single images.
Example of no spacing between images:


Example of custom spacing between images:

Working Out Spacing Between Images
Take the size of each image in this case which is 130px X 3 images = 390
Total width of content area = 680
680 – 390 = 290
290 pixels is the total amount of white space available between these images.
When you add spacing between your images, you can add it to the left and right side so you only need to space every second image.
In this case, the 1st and 3rd images.
This means you’ll be adding spacing to the left and right side of the first image and the left and right side of the third image.
In total, we’ll be adding space 4 times.
Divide your total space of 290 by 4 and you get 72.5
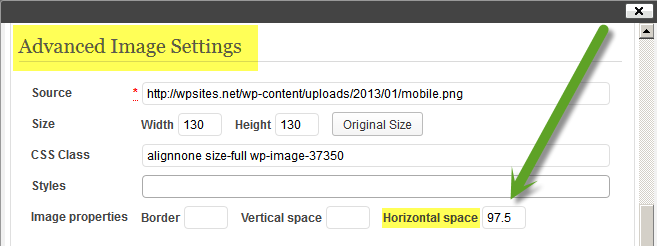
Add 72.5 as the Horizontal space to the first and third images using the Advanced Image Settings.
Advanced Image Settings

Once you’ve inserted your images in your post (using align none), edit each image and add the spacing (72.5) to the Horizontal Spacing field.
I’ve actually used 97.5 for this tutorial however the space depends on which page template you use and the total width of your content area.
Once you add the spacing using the Advanced Image Settings, you’ll find WordPress generates Styles for each image.
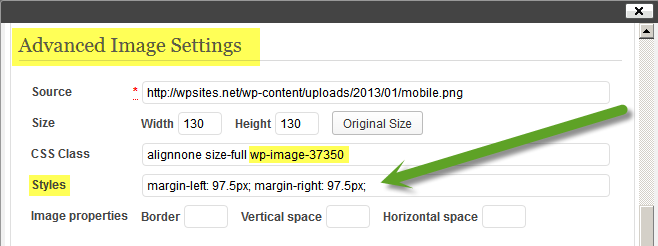
The Styles for each image include the spacing for left and right which you can adjust easily to make your images fit perfectly in a row with exact spacing between each.
Styling Images With CSS Class
You’ll also notice that each single image gets its own I.D in the CSS Class field which you can use to style specific images individually or using custom body classes to style all images on a page or post.
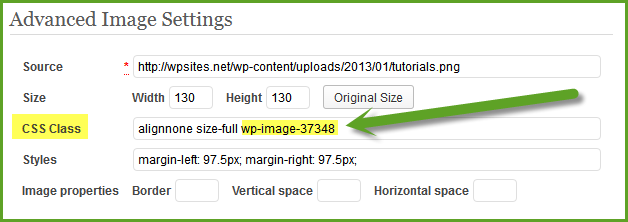
Example:
.wp-image-37348 {
border: solid 5px red;
}
You can also remove, add or change image border properties using the Advanced Images Settings in WordPress.
Gallery Thumbnails Versus Single Images
Why would you add images in a row using the above method rather than simply create and insert a gallery which spaces your images automatically?
- You might want to ad custom link url’s to each image which isn’t possible when using a gallery.
- You might not want you images linked to an attachment page or media file which happens when you create a gallery.
- You might not want your images displayed using the native lightbox effect which works on images in a gallery.
Further Reading
Linking Gallery Images To Custom URL’s
There’s a ticket on the WordPress core trac which has been unresolved for over 3 years which may interest you.
Leave a Reply
You must be logged in to post a comment.