
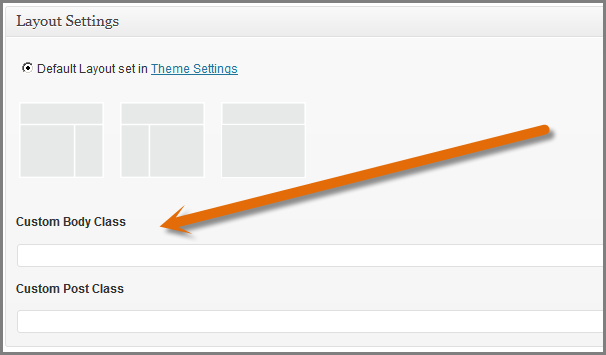
Some themes include a body class field built into the theme options or Layout Settings like Genesis.
This enables you to create a custom class which will apply to all images on that specific post or page.
The custom class selector enables you to style all HTML elements with the same CSS code for that specific page or post only.
Elements outside of the content area, like your footer, header and sidebar, will not be effected by the CSS code you apply to this custom class.
Example – Genesis Custom Body Class
Located in your Layout settings on all Edit Post/Pages.
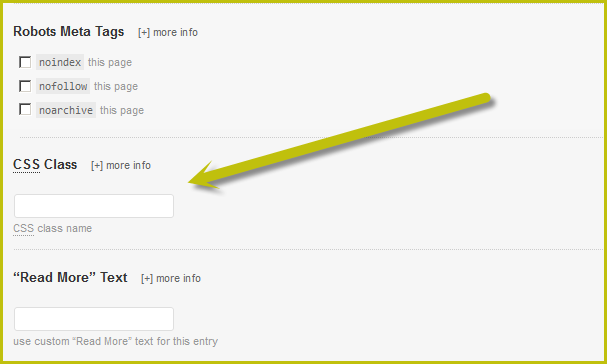
Example – Thesis Custom Class
Note: Custom classes cannot start with a number.
Thesis already creates a body class for pages (not posts) including pages for archives and categories.
You can grab the auto generated body class for pages from the source code.
If you use the field shown in the screenshot above, the default body class for pages will be overwritten with your custom class.
How To Use The Body Class
Simply create a unique name for your class in the Custom Body Class field and add it along with your declarations to your child theme’s style.css file.
Try using a CSS 3 Generator to create some fancy effects.
Simple Code Example
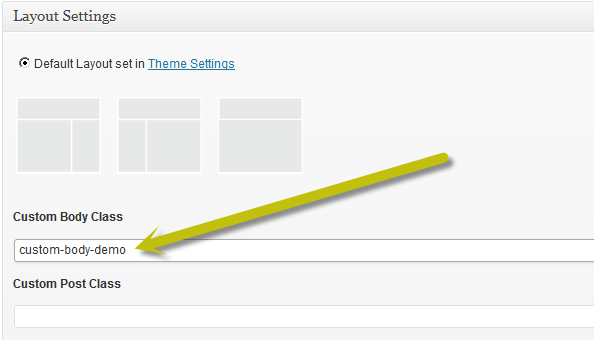
.custom-body-demo {
border: solid red 10px;
}
This code will create a frame around your site only on the page/post where you have created the custom class.
.custom-body-demo h1 {
font-family: 'georgia', arial;
color: #80000;
}
This code will change the font style and font color on the specific page or post you create the custom body class.
You see how easy it would be to display custom fonts on specific pages and posts in WordPress.
Add New Custom Body Class To Specific Page I.D
Simple paste this code into your child themes functions.php file and change the page i.d to suit your needs.
This code includes a custom body class named demo class which you can use to style the page with i.d of 007.
You can now view the body class in your source code.

Test your new custom class works by adding some demo CSS in your child themes style.css file:
.demo-class {
background: #000!important;
font-size: 32px;
}
Adding Body Class To Default Theme
If your theme doesn’t include a body class field built in, you can add this code with the parameter you want to use to your header.php file.
![]()
You’ll then need to add a custom function as well.
Simply paste this code in your child themes functions.php file and add your new body class to a specific page.
You can also add more classes to the template tag like this:
Header.php File
Here’s the body class template tag before adding the custom body class in the themes header.php.

The classes are restricted to the default template tags parameters.
Here are a few examples:
- home
- blog
- archive
- date
- single postid-(id)
- single-(post_type)
- page-id-(page_id)
- author
- category
- category-(slug)
- tag
- tag-(slug)
You can also view the output your custom body class creates in the View Source Code for that page/posts HTML using your browser.
Adding Styles To Your Custom Body Class
Once you have created the body class, you can then add your CSS declarations in your child themes style.css file.
You can use the body class selector and add your own declarations within the brackets.
.custom-body-demo {}.frame-all-images {}Using Body Class To Style Images
Once you’ve added your body class, you can then add styles in your child theme.
This CSS code will add a red frame to all images on the page or post which contains the custom body class of custom-body-demo.
.custom-body-demo a img {
border: solid red 10px
}
I’ll be adding more examples of CSS code snippets which you can use for styling all HTML elements on a specific page or post after creating a custom body class.
Resources
Leave a Reply
You must be logged in to post a comment.