
In this post, i’ll give you the code you can use to create a page template which showcases the members of your team. You can use this for staff, authors of a blog or user profiles for members.
This solution, in my opinion, is the most flexible, efficient and easiest to make your own because:
- There’s only one page template with minimal code.
- A small amount of PHP code for your functions file.
- The use of Dashicons which are already included in WordPress.
- No need to install any plugins.
- No need to create a custom post type.
- No need to host images or icons on your server.
- The CSS code works on any theme as all CSS code uses custom classes and not theme specific classes.
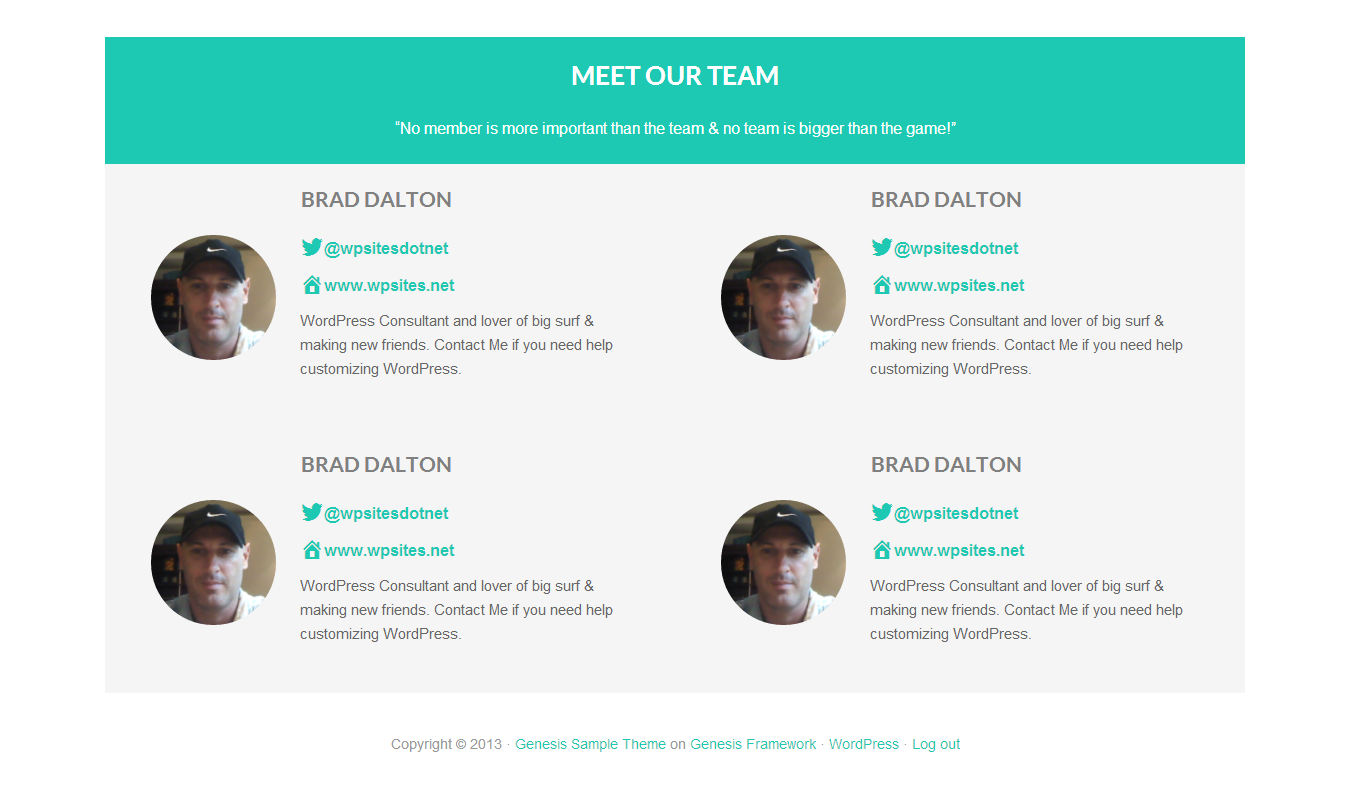
Here’s a very basic example of what the finished product looks like:
Functions File
This PHP code goes at the end of your child themes functions.php file:
//* Register widget areas
genesis_register_sidebar( array(
	'id'          => 'intro-widget',
	'name'        => __( 'Intro Widget', 'wpsites' ),
	'description' => __( 'Displays Full Content Sidebar Width.', 'wpsites' ),
) );
genesis_register_sidebar( array(
	'id'          => 'people-widgets',
	'name'        => __( 'People Widgets', 'wpsites' ),
	'description' => __( 'Displays People Side by Side 50%', 'wpsites' ),
) );
You’ll also need to enqueue the Dashicons for the front end:
page_people.php
This PHP needs to be added to a new page template named page_people.php using a text editor like notepad++
<?php

/* Template Name: People Template */

add_action( 'genesis_meta', 'wpsites_meta' );

function wpsites_meta() {

	if ( is_active_sidebar( 'intro-widget' ) || is_active_sidebar( 'people-widgets' ) ) {

        add_filter( 'genesis_pre_get_option_site_layout', '__genesis_return_full_width_content' );


        remove_action( 'genesis_before_header', 'genesis_do_nav' );
        remove_action( 'genesis_after_header', 'genesis_do_subnav' );


        remove_action( 'genesis_header', 'genesis_header_markup_open', 5 );
        remove_action( 'genesis_header', 'genesis_do_header' );
        remove_action( 'genesis_header', 'genesis_header_markup_close', 15 );

		remove_action( 'genesis_before_loop', 'genesis_do_breadcrumbs' );

		add_filter( 'body_class', 'wpsites_add_body_class' );

		remove_action( 'genesis_loop', 'genesis_do_loop' );

		add_action( 'genesis_after_loop', 'intro_widget' );

		add_action( 'genesis_after_loop', 'people_widgets' );

     }
}


function wpsites_add_body_class( $classes ) {

   $classes[] = 'people-template';
   return $classes;

}


function intro_widget() {

    echo '<div class="intro-section">';

	genesis_widget_area( 'intro-widget', array(
		'before' => '<div class="intro-widget widget-area"><div class="wrap">',
		'after'  => '</div></div>',
	) );

	echo '</div>';

}


function people_widgets() {

    echo '<div class="people-section">';

    genesis_widget_area( 'people-widgets', array(
		'before' => '<div class="people-widgets widget-area"><div class="wrap">',
		'after'  => '</div></div>',
	) );

	echo '</div>';

}


genesis();
Style Sheet
This CSS code needs to be pasted at the end of your child themes style.css file:
.people-widgets .widget {
	float: left;
	padding: 2% 4% 2% 4%;
	width: 50%;
}

.intro-widget {
padding: 2% 4%;
text-align: center;
background-color: #1EC9B3;
color: #fff;
width: 100%;
}

.intro-widget .site-container {
background: #1EC9B3;
}

.people-template .entry-image {
padding-right: 20px;
padding-bottom: 20px;
}

.avatar {
background-color: #F5F5F5;
border: 0;
border-radius: 50% 50% 50% 50%;
padding: 0;
}


.intro-widget .widget-title {
    font-size: 2.6rem;
    margin-bottom: 2.4rem;
    text-transform: uppercase;
	text-align: center;
	color: #fff;
}

.people-widgets .widget-title {
color: grey;
font-size: 21px;
margin-left: 150px;
font-weight: 600;
}

.people-widgets p {
font-size: 15px;
text-decoration: italic;
}

.dashicons-twitter1:before {
content: "\f301";
display: inline-block;
float: left;
color: #1EC9B3;
-webkit-font-smoothing: antialiased;
font: normal 24px/1 'dashicons';
}

.dashicons-admin-dashboard:before {
content: "\f102";
display: inline-block;
float: left;
color: #1EC9B3;
-webkit-font-smoothing: antialiased;
font: normal 24px/1 'dashicons';
}

.people-template .entry-content a {
border-bottom: 0;
color: #1EC9B3;
}

.people-template a {
border-bottom: 0;
color: #1EC9B3;
}

.people-template a:hover {
border-bottom: 0;
color: #1EC9B3;
}

.social-people {
margin-bottom: 10px;
}

.people-widgets {
background-color: #f5f5f5;
}

@media only screen and (max-width: 767px) {

	.people-widgets .widget {
	padding: 2% 4%;
	width: 100%;
   }

}
I’ve added a lot of CSS which you can easily modify to suit the styling of your theme.
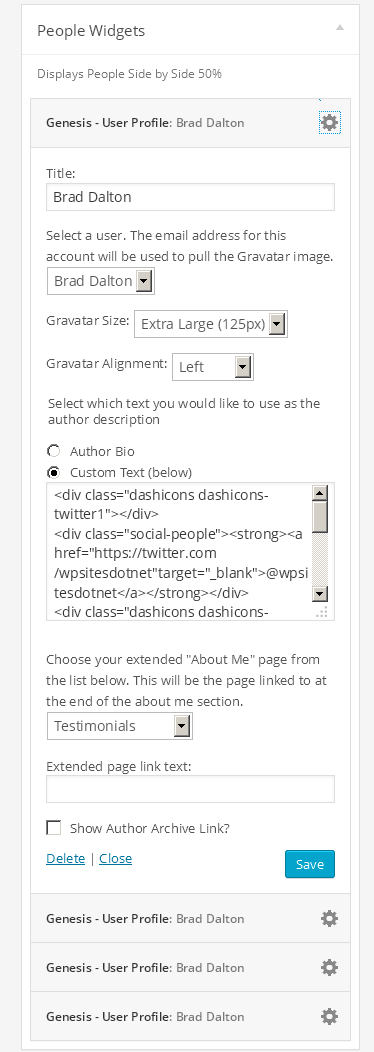
HTML – Genesis User Profile Widget
This HTML needs to be pasted in the Custom Text field of the Genesis User Profile widget for each team member.
You will need to modify this HTML by changing the links to each members Twitter & website link.
Here’s what one of the Genesis user profile widgets look like:
You can easily change all the colors, extend the intro header full width and modify the CSS code to your own liking.
The Genesis Users Profile widget enables you to select any user and display either the user profile or a custom profile.
You could also use another type of user profile widget like which Jetpack includes or simply use a text widget with HTML.
Another option is to use the Genesis featured posts/pages widget.
Leave a Reply
You must be logged in to post a comment.