
In this tutorial, i’ll provide the step by step instructions to add a header image or logo to the Education child theme by StudioPress.
By default, the Education theme comes with a logo which is 332px width x 83px height.
Here’s the default:
![]()
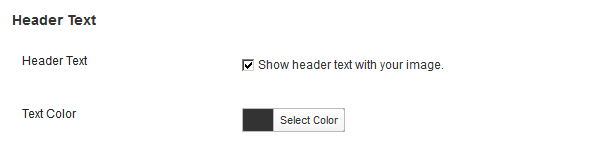
This default logo will not display if your header text box is checked. Go to Appearance > Header and scroll down to uncheck that box which shows checked in the screenshot below.
Add Smaller Size Logo
If your logo is smaller, you can simply upload it to your child themes images folder and replace the default named logo.png. Make sure you logo has the same file name.
Here’s what a 200px width X 50px height logo looks like:
![]()
But what if your image is taller or wider then the default size of 332px x 83px?
Add Taller Logo
You can simply add a logo which is taller than the default 83px however here is what it may look like:
![]()
Its cutoff at the bottom and the nav menu has been pushed lower.
To fix this, you will need to make some changes in your child themes style.css file.
In this example, i’ll add a logo which is 286px width by 150px height. Here it is:
![]()
Open your child themes style.css file with a text editor like Notepad++ and go to Line 182.
Change the value for the min-height in this code block from 120px:
#header {
	background-color: #fff !important;
	background-position: center top !important;
	border-top: 4px solid #eee;
	margin: 0 auto;
	min-height: 120px;
	width: 100%;
}
To 150px
#header {
	background-color: #fff !important;
	background-position: center top !important;
	border-top: 4px solid #eee;
	margin: 0 auto;
	min-height: 150px;
	width: 100%;
}
Here’s what it looks like now:

Still not right so you need to take the next step.
On Line 246, change the 120px in this block of CSS code:
.header-image #title-area,
.header-image #title,
.header-image #title a {
	display: block;
	float: left;
	height: 120px;
	overflow: hidden;
	padding: 0;
	text-indent: -9999px;
	width: 400px;
}
To 150px like this:
.header-image #title-area,
.header-image #title,
.header-image #title a {
	display: block;
	float: left;
	height: 150px;
	overflow: hidden;
	padding: 0;
	text-indent: -9999px;
	width: 400px;
}
Here’s what it looks like now:
![]()
The full size image is now displaying.
Add Wider Image
Lets add a image which is wider than the default 400px. We’ll use an image which is 500px width by 150px height.

Once uploaded to your child themes images folder, this is what it looks like:

The height looks ok because we changed the values in the code previously however the header right widget which contains the custom menu is hard up against the image.
To fix this, you can simply change the value for the width on Line 230 from this:
#header .widget-area {
	float: right;
	min-height: 95px;
	padding: 25px 0 0 0;
	position: relative;
	width: 740px;
}
To this:
#header .widget-area {
	float: right;
	min-height: 95px;
	padding: 25px 0 0 0;
	position: relative;
	width: 640px;
}
And this is how it looks like now:
![]()
Now the custom menu widget looks fine but the image is still cutoff on the right hand side.
To fix this, simply change the value for the width on Line 196 from 400px:
#title-area {
	float: left;
	overflow: hidden;
	padding: 27px 0 0;
	overflow: hidden;
	width: 400px;
}
To 500px:
#title-area {
	float: left;
	overflow: hidden;
	padding: 27px 0 0;
	overflow: hidden;
	width: 500px;
}
You’ll also need to change the values to 500px on Line 250.
From 400px:
.header-image #title-area,
.header-image #title,
.header-image #title a {
	display: block;
	float: left;
	height: 150px;
	overflow: hidden;
	padding: 0;
	text-indent: -9999px;
	width: 400px;
}
To 500px:
.header-image #title-area,
.header-image #title,
.header-image #title a {
	display: block;
	float: left;
	height: 150px;
	overflow: hidden;
	padding: 0;
	text-indent: -9999px;
	width: 500px;
}
And here’s the result:

If you want some space between your header image and the header right widget content, simply reduce the value for the width of the widget on Line 230:
#header .widget-area {
	float: right;
	min-height: 95px;
	padding: 25px 0 0 0;
	position: relative;
	width: 600px;
}
In the above code i have taken off 40px and here’s the result.

Using the Custom Header Feature
If you go to Appearance > Header, you’ll find a custom header page which makes it super easy to upload an image exactly the same size as the default.
If its not, you will be forced to crop your image which may not be ideal.
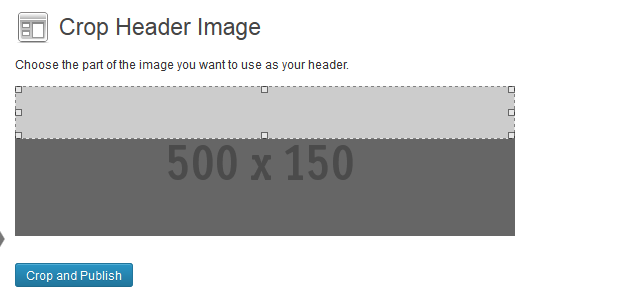
To fix this, simply change the width and height values on Line of your child themes functions file.
/** Add support for custom header */
add_theme_support( 'genesis-custom-header', array(
	'width' => 1140,
	'height' => 120
) );
To something like this:
/** Add support for custom header */
add_theme_support( 'genesis-custom-header', array(
	'width' => 500,
	'height' => 150
) );
Then you image will be uploaded without any problems:

That’s all for today’s tutorial about how to add different sized images to the Education child theme by StudioPress.
You’ll still need to modify the CSS code as previously shown even if you match the PHP functions values to the exact same as your image.
Leave a Reply
You must be logged in to post a comment.