
In this tutorial, we’ll take all the code and other stuff needed to add the same e-Mail Newsletter subscribe box included on the Metro Pro theme and add it to any other StudioPress child theme.
In this example, i’ll be using the Sample child theme however you could easily use the same code on any other theme, some of which may require a small amount of code tweaking.
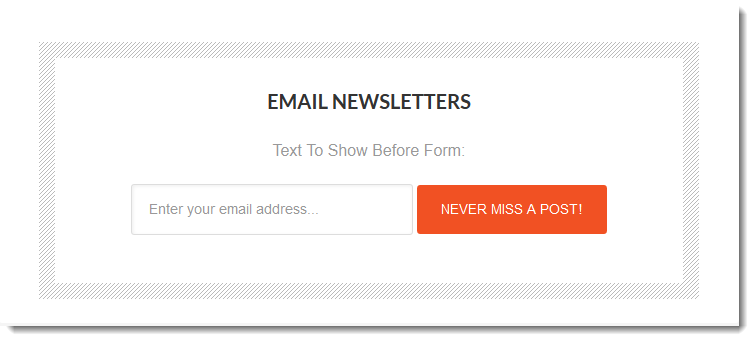
And here what it looks like without any additional styling:
Note: The hook in this code works on HTML 5 child themes only running Genesis 2.0.
Register & Hook In New After Entry Widget
This PHP code should be pasted at the end of your child themes functions.php file.
If you already have a after post widget, you can either changes the classes in the code or replace it with this code:
//* Hooks after-entry widget area to single posts
add_action( 'genesis_entry_footer', 'metro_after_post'  );
function metro_after_post() {

    if ( ! is_singular( 'post' ) )
    	return;

    genesis_widget_area( 'after-entry', array(
		'before' => '<div class="after-entry widget-area"><div class="wrap">',
		'after'  => '</div></div>',
    ) );

}

genesis_register_sidebar( array(
	'id'          => 'after-entry',
	'name'        => __( 'After Entry', 'metro' ),
	'description' => __( 'This is the after entry section.', 'metro' ),
) );
Add Styling
The CSS code needs to be pasted before the start of your Media Queries near the end of your child themes style.css file.
/* Metro Pro E-mail Subscribe Box After Entry
--------------------------------------------- */

.after-entry .widget-title {
	font-size:clamp(14px, 0.875rem + ((1vw - 3.2px) * 0.625), 20px);
}

.after-entry .enews-widget input {
	width: 50%;
}

.after-entry .enews-widget input[type="submit"] {
	width: auto;
}

.after-entry,
.after-entry .wrap {
	overflow: hidden;
}

.after-entry {
	background: url(images/lines.png);
	background-size: 8px 8px;
	margin-top: 32px;
	margin-top: 3.2rem;
	padding: 16px;
	padding: 1.6rem;
	text-align: center;
}

.after-entry .wrap {
	background-color: #fff;
	padding: 32px;
	padding: 3.2rem;
}

.after-entry p {
	margin-bottom: 20px;
	margin-bottom: 2rem;
}
Media Queries
This CSS code needs to be added to the different sections of your Media Queries:
/*
Metro Pro E-mail Subscribe Box Media Queries for Mobile Responsiveness
---------------------------------------------------------------------------------------------------- */
@media only screen and (-webkit-min-device-pixel-ratio: 1.5),
only screen and (-moz-min-device-pixel-ratio: 1.5),
only screen and (-o-min-device-pixel-ratio: 3/2),
only screen and (min-device-pixel-ratio: 1.5) {
.after-entry {
background-image: url(images/lines@2x.png);
}
}
@media only screen and (max-width: 767px) {
.after-entry .enews-widget input,
.after-entry .enews-widget input[type="submit"] {
width: 100%;
margin-bottom: 10px;
}
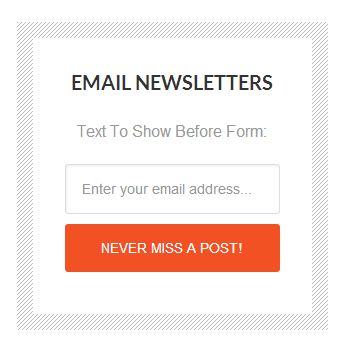
}Looks good on smaller screens:
Images
You’ll also need to upload 2 small images which create the border of lines around the box.
Upload these 2 images to your child themes image folder:
![]()
![]()
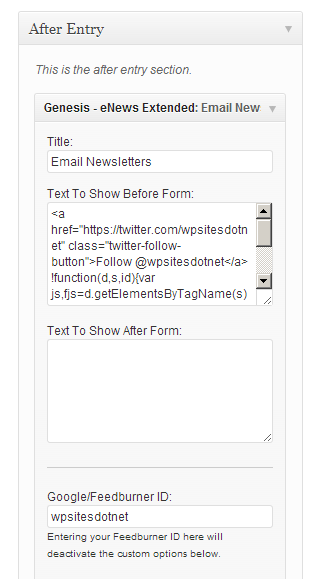
Install Genesis eNews Extended Plugin
This example uses the Genesis eNews Extended plugin where you can also add a Twitter follower Count button inside the widget.
Leave a Reply
You must be logged in to post a comment.