• Skip to primary navigation
  • Skip to main content
  • Skip to primary sidebar

WP SITES

2785

Original Genesis & WooCommerce Tutorials & 6000+ Guaranteed Code

Snippets

  • Try Premium
  • Log in

Add Widget On Page Inside Content Area

To display a widget on a page, you could install a plugin which creates a shortcode.

Or you could simply add a few extra lines of PHP to your code that creates your widget.

This tutorial provides 2 code snippets you can use to add a new widget area within the body of your content area.

  1. The 1st snippet works with Genesis
  2. The 2nd snippet works with any theme

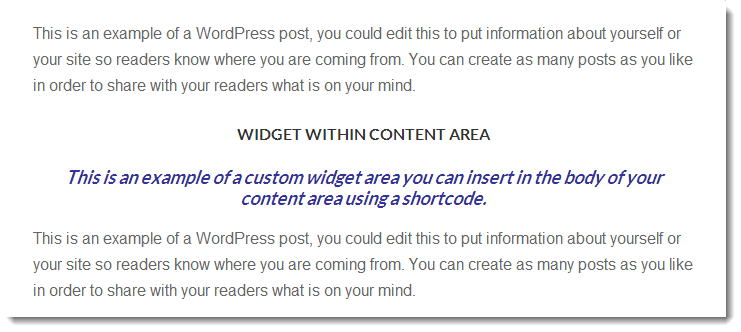
This example show you the widget text between the 1st and 2nd paragraphs in a post.

Widget Within Body of Content

The PHP simply creates a new widget with a shortcode.

Add the PHP code to your functions file and the shortcode to your text editor.

Genesis Widget Area Shortcode

genesis_register_sidebar( array(
    'id' => 'wpsites-widget',
    'name' => __( 'Custom Widget', 'genesis' ),
    'description' => __( 'Custom Widget Area', 'childtheme' ),
) );

add_shortcode( 'wpsites_widget', 'add_genesis_widget_area' );
function add_genesis_widget_area() {
    ob_start();
    genesis_widget_area( 'wpsites-widget', array(
    'before' => '<div class="wpsites-widget widget-area">',
    'after'  => '</div>',
    ) );
    $wpsiteswidget = ob_get_contents();
    ob_end_clean();
    return $wpsiteswidget;

}

// Add this short code anywhere in your editor
[wpsites_widget]

Any Themes Widget Area Shortcode

register_sidebar( array(
    'id' => 'wpsites-widget',
    'name' => __( 'Custom Widget', 'wpsites' ),
    'description' => __( 'Custom Widget Area', 'wpsites' ),
    'before_widget' => '<div>',
    'after_widget' => '</div>',
) );

add_shortcode( 'wpsites_widget', 'wpsites_shortcode_widget_area' );
/**
 * @author    Brad Dalton
 * @link   https://wp.me/p1lTu0-eJI
 */
function wpsites_shortcode_widget_area() {
    ob_start();
    dynamic_sidebar( 'wpsites-widget', array(
    'before' => '<div class="wpsites-widget widget-area">',
    'after'  => '</div>',
    ) );
    $wpsiteswidget = ob_get_contents();
    ob_end_clean();
    return $wpsiteswidget;

}
// Add this short code anywhere in your editor
[wpsites_widget]

Related Tutorials

  • How To Add A Email Opt In Form In The Content Area of a Page
  • Display Ads After Specific Paragraph on Single Posts
  • Add Social Icons Widget to Nav Menu – 2 Different Examples

The Content

Reader Interactions

Comments

  1. John Huotari says

    September 22, 2014 at 7:20 am

    Brad,

    Thank you very much for posting this. I’ve been able to make it work on our site.

    I do have a question, though. I’m try to use this code to add a widget for a 300×250 ad and have it float left or right. Here’s the problem: Is there a way to get the text that follows the widget to float or wrap to the right or left of the widget, rather than resuming below it? What I’m getting now is text, followed by the widget in line horizontally with some white space, followed by more text. I’m trying to figure out a way to get that second section of text to move up into the white space. I’ve tried different settings for clear, float, and display but haven’t found anything that works yet.

    Any help you can provide will be greatly appreciated.

    Thank you,

    Log in to Reply
    • John Huotari says

      September 25, 2014 at 5:02 am

      Brad,

      I was able to insert an ad widget and get the text to wrap using CSS rules embedded within the div tags, setting width and height and float: left.

      I tried adding a second widget a little lower on the page, duplicating the code but using a slightly different widget name. I called the first widget inside_posts and the second inside_posts_2. That didn’t work, so I changed the second widget name to inside_posts_second. But that didn’t work either. In both cases, I got a white screen.

      Do you know if it’s possible to create a second widget area within the content?

      Thank you,

      John Huotari
      Oak Ridge Today

      Log in to Reply
      • Brad Dalton says

        September 25, 2014 at 5:23 am

        Yes, use this code:

        register_sidebar( array(
            'id' => 'wpsites-widget-two',
            'name' => __( 'Custom Widget Two', 'wpsites' ),
            'description' => __( 'Custom Widget Area Two', 'wpsites' ),
            'before_widget' => '<div>',
            'after_widget' => '</div>',
        ) );
        
        add_shortcode( 'wpsites_widget_two', 'wpsites_shortcode_widget_area_two' );
        /**
         * @author    Brad Dalton
         * @example   <a href="http://wpsites.net/" rel="nofollow ugc">http://wpsites.net/</a>
         * @copyright 2014 WP Sites
         */
        function wpsites_shortcode_widget_area_two() {
            ob_start();
            dynamic_sidebar( 'wpsites-widget-two', array(
            'before' => '<div class="wpsites-widget widget-area">',
            'after'  => '</div>',
            ) );
            $wpsiteswidgettwo = ob_get_contents();
            ob_end_clean();
            return $wpsiteswidgettwo;
        
        }

        Log in to Reply
        • John Huotari says

          September 25, 2014 at 6:50 am

          Thank you, Brad. I got it to work.

          This time, though, I added the style rules in the div tag after ‘before_widget’.

          You can see the result on this page: http://oakridgetoday.com/2014/09/23/oak-ridge-mall-new-name-banks-considering-financing/

          I think there is one small typo in the code you posted above. I think it should be wpsites-widget-two in the div tag after ‘before’, rather than wpsites-widget.

          Thank you,

          John Huotari
          Oak Ridge Today
          http://oakridgetoday.com

          Log in to Reply
          • Brad Dalton says

            September 25, 2014 at 6:55 am

            I used the same class so both widgets use the same CSS. You only need to make the widget I.D’s and function names unique unless you want to style each widget differently.

          • John Huotari says

            December 2, 2014 at 4:55 pm

            Brad,

            A follow-up: I was able to insert a third widget (an ad) into a story using code similar to that used for the second widget. I assume I could continue using a modified version of that code to add as many widgets as I like.

            You can see a story with the three widgets here: http://oakridgetoday.com/2014/12/01/epa-oak-ridge-is-a-green-power-community-of-the-year/

            Thanks again for your help.

            John Huotari
            OakRidgeToday.com

          • Brad Dalton says

            December 3, 2014 at 1:03 am

            Yes. You will need to register new widgets with unique I.D’s as well as duplicate the code.

            Example:

            Another option is to use custom fields if you want to add content on a large number of posts or pages in any hook position.

  2. Brent Dawson says

    September 15, 2014 at 6:56 pm

    Thanks For the Post Brad, Great info
    I was just searching on how to do this and found your post

    Thanks

    Log in to Reply
    • Brad Dalton says

      September 15, 2014 at 10:29 pm

      Thanks for stopping by Brent.

      Log in to Reply
  3. Damien Carbery says

    September 15, 2014 at 6:11 pm

    After reading the excerpt in the post notification email I was expecting an automated insertion of the sidebar via a the_content filter. Maybe a late running filter that searches for and inserts the dynamic_sidebar() after it.

    Log in to Reply
  4. Ben Siegfried says

    September 15, 2014 at 5:00 pm

    Doesn’t Motopress do the same thing too?

    Log in to Reply
    • Brad Dalton says

      September 15, 2014 at 5:16 pm

      Not sure but it might.

      Log in to Reply

Leave a Reply Cancel reply

You must be logged in to post a comment.

Primary Sidebar

Code written by Brad Dalton specialist for Genesis, WooCommerce & WordPress theme customization. Read More…

Advertise · WPEngine · Genesis · Log in

  • Access Problems
  • Account Details
  • Consulting
  • Tags
 

Loading Comments...
 

You must be logged in to post a comment.