
In this beginners guide for Genesis users, i’ll show you how easy it is to style your author box.
First step is to enable your author box.
Go to Users > Your Profile > Author Box. Here’s what the settings look like:

While you’re at it, may as well add a text description in the Custom Description Text box:

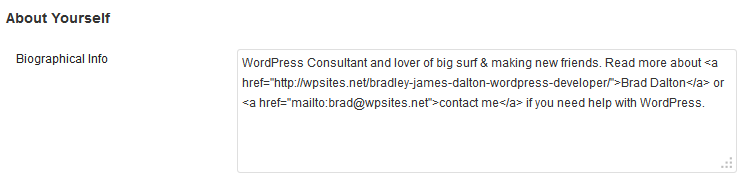
Note: If you want HTML links in your author box, please paste the HTML into your User Profile > About Yourself > Biographical Info box.
Here’s what your author box looks like if using the free Genesis 2.0 Sample child theme.

Once you’ve decided where you want your author box to display, you can then start to style it.
Note: All CSS code should be pasted at the end of your child themes style.css file.
Add Background Color
.author-box {
    background: #21759B;
}
Here’s what it looks like now:

Change Text Color
Now we’ll need to change the text color:
.author-box {
    background: #21759B;
    color: #fff;
}
And here’s the result:

Change Title Color
But the color of the author box title also needs changing so we’ll add this code below to the above code snippet.
.author-box-title {
color: white;
}
And here’s the result:

Change Link Color
But wait. How about the link color? Shouldn’t they be a different color to the text?
If you’ve added some HTML links in your User Profile > About Yourself > Biographical Info, you may want to make your links stand out.
This code will change the link colors and add a line under each link in your author box:
.author-box a {
    color: black;
    border-bottom: 1px dotted grey;
}
Here’s what your author box will look like now:

Change Margin Between Avatar & Text
How about moving the text closer to the avatar image?
.author-box .avatar {
    margin-right: 1.4rem;
}
And here’s the result:

Make Avatar Round
Here’s the code to make your author boxe avatar round:
.author-box .avatar  {
border-radius: 50% 50% 50% 50%;
}
And here’s what your avatar looks like now:
![]()
Change Avatar Size
This code assumes you’re using an email address which is connected to a Gravatar account for your author image.
You can change the size of your gravatar image using CSS or PHP code:
.author-box .avatar {

	height: 100px;
	margin-right: 34px;
	margin-right: 3.4rem;
	width: 100px;
}
All PHP code should be pasted at the end of your child themes functions.php file using a text editor like Notepad++.
add_filter( 'genesis_author_box_gravatar_size', 'change_author_box_avatar_size' );
function change_author_box_avatar_size( $size ) {

	return 100;

}
Simply change the number in the code above from 100 to any size you like.
Conclusion
There’s a lot more you can do to style your author box in Genesis like add social media buttons etc.
Leave a Reply
You must be logged in to post a comment.