If you have just purchased a web hosting plan and already own a domain name, you’ll need to point the domains name servers (DNS) to your web host.
To do this you’ll need the new namerserver settings which you then enter in the correct fields in your domain managers control panel.
Here’s a video explaining how to change nameservers if you are using Godaddy or Netfirms as your domain manager.
Change Nameservers – Video
Locate Your Nameserver Settings
The new nameservers for your web hosting account should be included in the account info email you receive after you sign up for a hosting account.
If you can’t locate the email from your web host, simply contact them directly to find out your nameserver settings.
Example Name Server Settings
Here’s an example of what these settings will look like:
Private Nameservers
ns1.wordpresssites.net (216.172.165.240)
ns2.wordpresssites.net (216.172.165.241)
Shared Hosting Nameservers
If you are hosting with Hostgator, they will look more like this:
ns1.hostgator.com
ns2.hostgator.com
If you are hosting with Bluehost, these are the exact nameservers:
ns1.bluehost.com
ns2.bluehost.com
Changing DNS at Other Registrars – Videos
Here a list of movies about how to change your nameservers at some of the most popular domain registrars.
Login to Your Domain Manager/Registrar
Once you have located your new DNS – Domains Name Server settings, login to your domain registrar/managers control panel and if you are using Godaddy, click on My Account.
You should now see your domain name listed below. If not, locate the Domains tab and click Domain Management.

Next step is to Click on the Domain you wish to edit the settings for and locate the Nameservers tab.

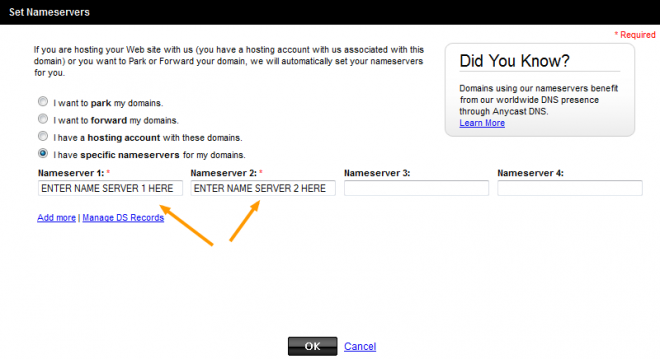
Next you’ll need to hover your mouse over the Nameservers tab and you’ll see a drop named Set Nameservers which you’ll need to click.
Set Nameservers

Enter New Name Server Settings

Enter your new name server settings into the correct fields in the form of ns1.example.com & ns2.example.com
DNS – Nameserver Change Completed
You may need to wait a few hours depending on where your domain registrar/manager and web host are located. If they’re both located in the United States, then the change should occur very quickly and take no longer than 2-3 hours max.

You should now be able to login to cPanel and access your web server for your new domain.

Leave a Reply
You must be logged in to post a comment.