There’s several ways to move WordPress to a new domain on a new server as well as changing domain names on the same server.
I’ve already covered the other methods of moving WordPress to a new domain which you can access using the links below.
If you’re also moving to a new server, these are the options you can choose from:
- Use a backup, migration & restoration plugin
- Use a free transfer from your web host
- Use a site move service
- Move WordPress manually yourself
If you’re moving your WordPress blog on the same server (same web host) you can still use these solutions as well.
If you want to change your domain name on the same server which only allows one domain then you’ll need to change the primary domain on your account.
Lets discuss the process of moving WordPress to a new domain manually.
In this long tutorial, i’ll cover both:
- Moving WordPress to a new domain on the same server
- Moving WordPress to a new domain on a different server
Caution: Its always best practice to backup your databases and files before making any changes in WordPress.
Move WordPress to a New Domain On The Same Server
Point Your New Domain to Your Server
Once you have your new domain name you’ll need to make sure the Domains Name Servers (DNS) are pointing to your current web hosts servers.
Here’s a tutorial & video on how to change your domains name servers.
Wait 2-3 hours minimum as this is how long it normally takes to change across the internet. (propagate)
Create an Addon Domain in cPanel
You’ll need to create an addon domain in your existing cPanel account which also creates a new file folder directory for your WordPress files.
Read more on how to create an addon domain in cPanel here.
When you create an addon domain in cPanel, it will also create a new directory for your WordPress files which you will move from the old domains directory.
Change Your WordPress URL’s
Caution: This step will cause your site to go down. Another option is to skip this step and change the URL’s in phpMyAdmin after you import your DB backup to your new DB
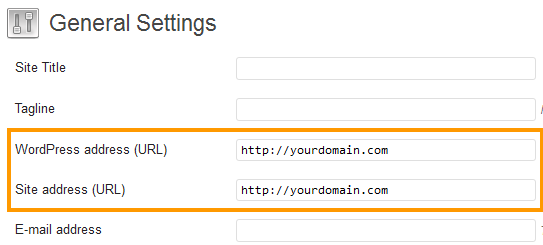
Login to your WordPress admin panel and navigate to Settings > General
Here you can change your:
- WordPress address (URL)
- Site address (URL)
Change these URL’s to your new domain name and click Save.
Backup & Export SQL Database
Login to phpMyAdmin and export your WordPress database tables in SQL format to your local computer.
Login to cPanel and navigate to the Databases section
Click on phpMyAdmin and navigate to the WordPress database in the left hand sidebar of phpMyAdmin
You will see a list of databases so make sure you click the one containing your WordPress content.
Read more on using phpMyAdmin to create a database backup
Create a New Database
Create a new database in cPanel and import your database backup.
Read more about how to create a database for WordPress here
Take note of the new database details: Database Name, Username & Password.
Move WordPress Files
Select all your existing files and move the contents of your WordPress files directory to your new addon domains directory.
Edit WP-Config.php
Enter your new database details in your wp-config.php file
Here’s more on how to edit wp-config.php file
If you have any problems with broken links you can use the search and replace plugin to search for all instances of your old domain name and change the links to your new domain name.
Create a cPanel Redirect to Your New Domain
In order to make sure all external incoming links redirect to your new domain, you’ll need to create a redirect in cPanel.
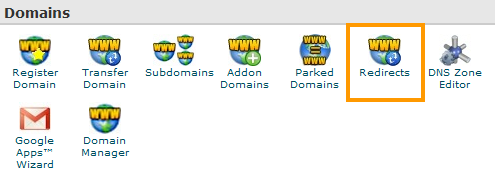
Navigate to the Domains section in cPanel and click on Redirects.
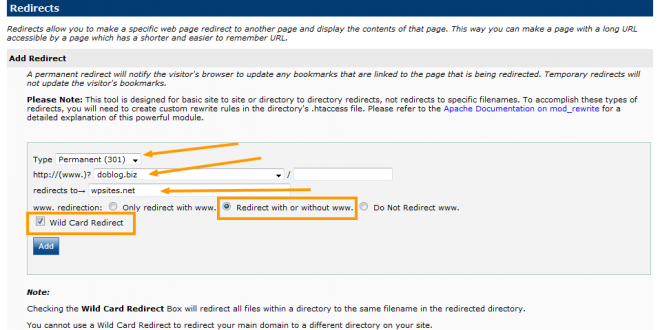
Inside Redirects you can enter the name of the new domain you wish to redirect your old URL’s too.
- Setup a 301 Permanent Redirect
- Select the old domain name
- Enter the new domain domain name you wish to redirect too
- Redirect with or without www
- Check Wild Card Redirect
Now click on the Add button and the redirect will be written into your .htaccess file.
Move WordPress to a New Domain on a New Server
Note: Using this method will mean your site will suffer some downtime after you change your site URL’s and import the backup to your new database on your new server.
Change Your DNS
Login to your Domain manager/registrar and point your new domain name to your new web hosts server.
Read more about how to change your DNS – Domains Name Servers
Note: You’ll need top wait 2-3 hours minimum before your domain propogates to your new web server.
Create a New Database in cPanel
Create a New database in cPanel on your new web Hosts server.
Read more about how to create a database for WordPress here
Note: Take note of your new database name, username and password as you’ll need to enter these into your wp-config file in the next step.
Copy Your WordPress Files to Your Local Computer
Using FTP, transfer a copy of your sites directory to your local computer
Edit Your Database Configuration File
You’ll need to add your new database details to your old WordPress files so your files connect to your database on your new server.
Read more on how to edit wp-config.php file
Upload WordPress Files to New Server
Login to your server using your FTP client and upload your files to your public_html directory. If you have created an addon domain, sub domain or sub directory, then upload your files to that directory.
You could upload the entire file folder directory from your local computer and use that as your new directory or upload the files within the directory to your new file folder on your new server just don’t put a folder with a folder.
Change Site Url’s
As explained at the start of this post, one way to change domain names is to change the WordPress URL & Site URL in your WordPress admin.
Login to your WordPress admin panel and navigate to Settings > General
Here you can change your:
- WordPress address (URL)
- Site address (URL)
Click save after changing both URL’s to your new domain.
Backup & Export Your Database
Login to phpMyAdmin and locate your WordPress database.
Click the database name in the left hand panel
Click the Export tab and export all your .sql database tables to your local computer.
Read more on using phpMyAdmin to create a database backup.
Import Old Database to New Database
Login to cPanel on your new server and navigate to phpMyAdmin
Click the new database you created previously and click the Import tab
Locate your old .sql database file backup on your local computer and import it into your new database on your new server.
Create Redirect in cPanel
Under the Domains section on cPanel, click Redirects and create a 301 permanent redirect to your new domain.
Check the Wild Card box and the redirect will be written into your htaccess file in your new domains file folder directory.
Conclusion
Normally i would use a plugin to change a domain name and move WordPress to a new server as its easier & faster.
This is clearly the longest way to do things and may be the only option for some. DNS can take between 2-48 hours to change depending on where your domain is hosted and where you web server are located.
If you have the time, you’ll learn much more about WordPress completing the domain change manually.
Helpful Resources:


Leave a Reply
You must be logged in to post a comment.