If you decide at some stage to try out VPS then you’ll probably be entitled to private name servers as VPS is commonly used for resellers of hosting.
Resellers want their own branded Name Servers rather than use Hostgators or another web hosts name in the DNS address.
If you use a shared hosting plan then your nameservers may look like this:
ns1.bluehost.com
or
ns1.hostgator.com
VPS and Dedicated hosting plans offer private nameservers which might look like this:
ns1.wpsites.net
or
ns1.yourdomain.com
This is actually one of my own private nameservers which i could use if i wanted to resell web hosting, which i don’t do. I simply use a VPS hosting plan to host this site plus the 3 sub domains of this site as well as videos and images.
Benefits of Private Name Servers for Resellers
Another huge benefit of using private nameservers is when moving to a new server. If you have clients you have resold hosting accounts to you won’t need to get them to change the nameservers if you upgrade a higher level VPS plan or dedicated server.
How Do I Setup Private Nameservers?
You need to login to the control panel at your domain manager or domain register. Each domain registrar uses a slightly different process of creating private name servers.
You can find more information on how to setup and create private name servers using several of the leading domain managers and access a specific step by step walk through for each separate domain registrar here.
How Do I create Private Name Servers
Once you have logged into your domain managers control panel, look for any of these: DNS, Edit DNS, Add DNS, Modify DNS
Here’s what it looks like using netfirms

There’s 2 fields you need to pay close attention to:
Host
&
Points To:
You need to enter ns1 into Host and your I.P address for ns1.yourdomain.com
You should have received these details in a welcome email when you signed up for VPS.
Example:
Your name servers that must be registered are:
ns1.wpsites.net (216.172.165.240)
ns2.wpsites.net (216.172.165.241)
So if you follow what i have done using your own settings and add both ns1 and ns2 to the Host fields and the corresponding I.P addresses to the Points To: fields, then you should be fine.
Whats Next? Updating DNS – Adding A record
You ‘ll also need to add 2 A records to this domain
How To Add A Records & Update DNS for Private Nameservers
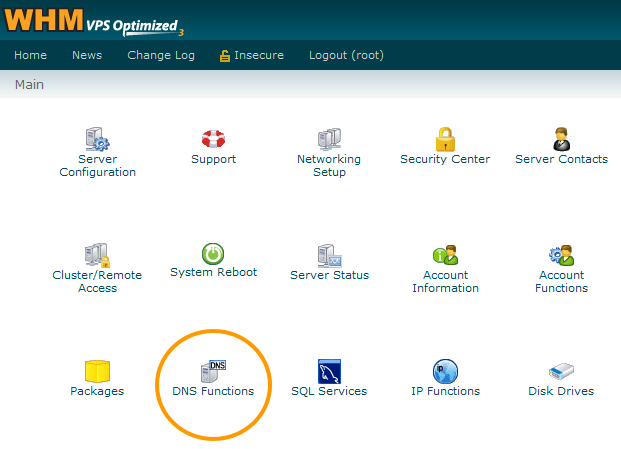
Login to WHM and click on DNS functions

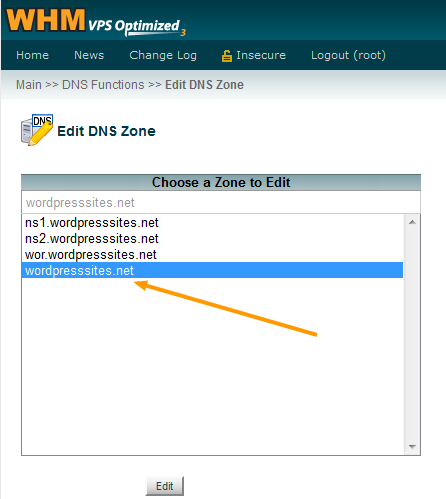
Click on Edit DNS Zone

Click to highlight your domain name like the example below

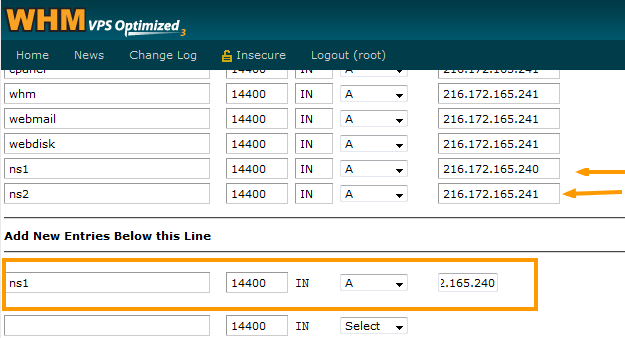
Click the Edit Button and scroll down to Add New Entries Below this Line

You can clearly see from the above screenshot that i have already added A records for both ns1 & ns2 I.P addresses
To do this, simply add ns1 then select A from the from down.
Delete “IP or Hostname” from the next box and paste in the I.P address for ns1.
Repeat with ns2 and the second I.P address then click the Save button.
Refresh and go back to check that they have been added correctly later. You only need to Add an A record for your primary domain name which is wpsites.net in my case. Not for every domain you add for yourself or clients on your VPS account
Conclusion:
Setting up VPS hosting involves a fair amount of time and effort for beginners. I’ll be writing more step by step tutorials as well as creating video’s covering the complete process which will include a video on How To create Private Nameservers.

Leave a Reply
You must be logged in to post a comment.