 If you’ve recently installed the Wishlist membership plugin for WordPress to create a membership site, you’ll need to complete the integration steps with Paypal.
You could install a shopping cart or eCommerce plugin or simply integrate your membership site directly with Paypal.
In this WordPress tutorial, i’ll show you how to integrate the Wishlist membership plugin for WordPress directly with Paypal and create payment buttons so you can collect payment for access to different levels of your membership site.
What You’ll Need Before Getting Started
Once you’ve installed the Wishlist plugin, go to WL Plugin in the left hand sidebar of your WordPress admin screen and click the WL Member link.
WL Member » Integration » Shopping Cart
You’ll arrive at your WishList Member Dashboard where you’ll see a tab at the top right hand corner named Integration.
Click Integration to start setting up your shopping cart settings.
Wishlist integrates with 1o shopping cart systems.
In this tutorial, we’ll be integrating Wishlist directly with a Paypal Business account. If you already have a Personal Paypal account, you’ll need to upgrade to a business account.
Step 1. Configure Paypal Settings.
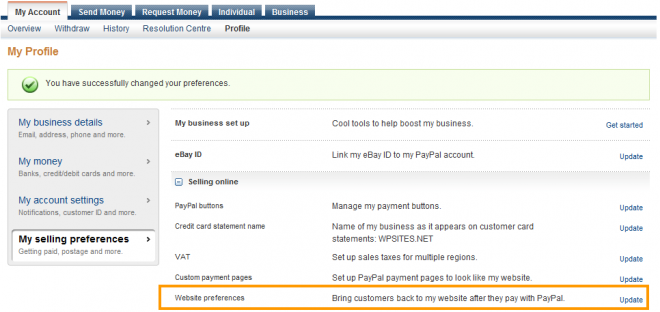
Set the following configurations under “My Account” » “Profile” » “My selling preferences” » Click Update “Website Preferences” » “Website Payment Preferences” in your Paypal account:

Complete these 3 requirements and click the Save button to access your Paypal “PDT Identity Token”.
- Auto Return On.
- Return URL Must not be blank. You can use any link you want but cannot be blank. Wishlist recommend using the homepage of your site however i recommend you create a Thank You Page so your customers come back to your website after they pay with PayPal. See the yellow text below for an example of a Thank You Page which is also Paypal requirement.
- Payment Data Transfer On.
Thank You Page Example: Thank you for your payment. Your transaction has been completed and a receipt for your purchase has been emailed to you. You may log into your account at www.paypal.com to view details of this transaction.
Step 2. Paste your Paypal “PDT Identity Token” from Paypal.
You may retrieve your Paypal PDT Identity Token by going to “My Account” » “Profile” » “Website Payment Preferences” in your Paypal account.
Enter your PDT Identity Token in the required field under Step 2 of Paypal Integration and click the save button.
Step 3. Create a Paypal Button
Navigate to the Merchant Services Section in your PayPal Business account.
Here you’ll need to create a button for each membership level using the Item/Subscription ID specified below. If you only have one membership level then simply create a Paypal button for that level using the unique I.D generated by your Wishlist plugin.
There’s 2 different buttons you can create for integration with your membership site:
- Create a Paypal Buy Now Button for a one time membership payment
- Create a Paypal Subscribe Button for recurring payments
Integrating Paypal directly with the Wishlist membership plugin takes a fair amount of time and effort but not as much as setting up one of the 10 shopping cart solutions Wishlist integrates with.


Leave a Reply
You must be logged in to post a comment.