 If you’re Setting up Paypal Integration With your Wishlist Membership Plugin you may need to create a Paypal Subscribe Button button and setup monthly recurring billing.
If you’re offering a one off membership, you’ll need to create a Paypal buy now button instead.
In this short tutorial, i’ll show you how simple it is to create a subscrine button in your Paypal account.
Firstly, navigate to the Merchant Services Section in your PayPal Business account.
Here you’ll need to create a button for each membership level using the Item/Subscription ID specified below.
If you only have one membership level then simply create a Paypal button for that level using the unique I.D generated by your Wishlist plugin.
- Firstly, log in to your PayPal Business account at https://www.paypal.com.
- Click the Profile subtab.
- Under the Selling Preferences heading, click the My Saved Buttons link.
- In the Related Items box on the right, click the Create new button link.
- In the Choose a button type drop down menu, select “Subscriptions.”
- Enter the payment details of your subscription. Subscription name – Enter a name for the subscription. For example, enter “Gold membership level”. Recurring amount to be billed – Enter the amount you want to bill subscribers for each monthly billing cycle. For example, enter “39.00”.
- Scroll to the bottom of the page, and click the Create Button button.
- Click the Select Code button on the Websites tab to select all of the generated HTML code.
- Paste the code into your WordPress HTML editor and save the changes.
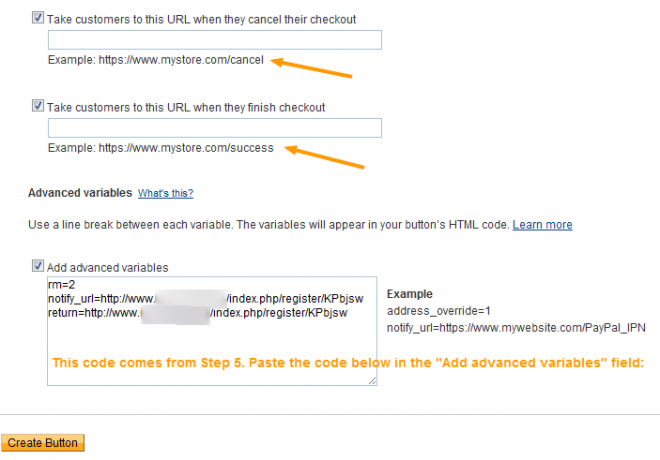
Note: If you’re creating a Paypal button which is integrated with Wishlist membership plugin, you’ll need to paste the code from Step 5 of the WL Member » Integration » Shopping Cart settings. Looks something like this depending on what URL you set for the ‘Thank You URL”.
You also need to enter a URL in these fields:
- Take customers to this URL when they cancel their checkout – Home page
- Take customers to this URL when they finish checkout – Login page for access to membership site
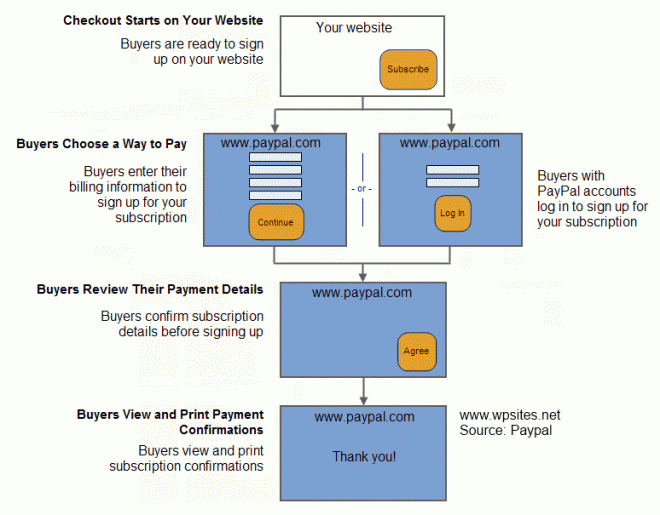
Paypal Subscribe to Checkout Process
When your subscribers buy a subscription from your website, they follow this process.
Once you’ve created a subscribe button for your website, your customers follow this process to the checkout.


Leave a Reply
You must be logged in to post a comment.